I don't about you, but desserts are definitely low on my list of favourite things to cook. I chafe under the strictness of baking, my sweet tooth is usually focused on ice cream or cookies from competent bakers, and I find there's very little opportunity for experimentation.
That being said, we all have to learn to make dessert at some point. I learned many, many years ago to make
Doomsday Bars and
Bananas Foster, but the first is more of a portable snack (made almost entirely of sugar) for camping, and the second was one of my duties as pasta cook at Big Daddy's back in 1996 (and it was served over vanilla ice cream instead of French Toast). When I began my current love affair with cooking, dessert simply didn't register.
I think the real trepidation comes from the fact that 90% of desserts are baked in some form or another. Baking kinda scares me. I've done virtually none in my lifetime, unless you count meatloaf. I tried baking cookies
once a couple of years ago, and while they were tasty, a couple of kneads of the dough too many and the cookies were just too damn hard.
But, fear not, fellow bakeophobe, out of the fridge comes the easiest foundation for making a tasty dessert one can find: whipped cream. Who doesn't have a childhood memory of licking the beater or whisk clean after Mom or Dad prepped the whipped cream for a Strawberry Shortcake?
The great thing about whipped cream is that it only needs one ingredient (possibly two or three, depending on what you're doing) and minimal technique (but a fair bit of effort if being done by hand).
How To Make Whipped Cream
Essentially, all you need for whipped cream is a carton of whipping cream (35% milk fat - usually sold in a golden-yellow carton), a fairly large bowl and either a whisk, an egg beater or an electric mixer/beater.
First step is to empty the carton of cream into the bowl. At this point, you may add additional flavouring. Certainly, many folks like to add sugar to their whipped cream to make it sweet. You wouldn't want to use more than a tablespoon of sugar per 500 ml carton of whipping cream. I prefer to use a tablespoon of maple syrup, but that's just me. Another flavour addition is vanilla, but if you're using vanilla extract, you don't want to use too much; no more than a half teaspoon per half litre carton or cream.
Next comes the whuppin'... um, I mean whipping. How you whip depends on what tool you're using. If using a regular whisk, make sure you whisk the cream thoroughly and quickly, beating it as fast as you can (get your mind out of the gutter!) with the whisk until the cream thickens and solidifies somewhat. Basically, whup that mutha 'til it's the consistency of whipped cream. Now, this may cause your forearm muscles to hurt a bit and it takes about 10-15 minutes, but it's a great form of stress release. When using the egg beater or electric beater, it takes less time, somewhere around 5-10 minutes.
Once the whipped cream is ready, it's time to make a dessert! Now, neither the girlfriend nor I are very dessert-oriented cooks, but we find ourselves often scouring the kitchen 30 minutes after dinner looking for a "bite of sweet", but just nibbling on chocolate or whatnot never quite does the trick. But as it happened, we had an apartment full of Xmas chocolate, cookies and other sweets lying around. So, the first dessert idea was to crush some Ferrero Rocher chocolates and sprinkle them over whipped cream in a smallish dessert dish/ramekin. As you can see below, it was actually quite a pretty dessert and completely met the "bite of sweet" requirement".
 |
Whipped Cream topped with crumbled Ferrero Rocher chocolates - photo by kira_generika
The other dessert idea was a little more ambitious (i.e. crazy). I had lots of leftover cookies from the holidays, but they'd kind of gone stale and rock-like. But, if you crumble them up and pan-fry the pieces with some butter to soften them and give some extra flavour, then layer them in a bowl with maple-pecan fudge, whipped cream, and grated dark chocolate, well then you're in business! Actually, you're probably in diabetic shock. The fudge was a bit too much... But this "pan-fried parfait" would have been perfect if the fudge had been omitted. Or if somehow bacon was incorporated...
Breakfast for Dessert?
Another fun dessert idea that came about recently was a slight variation on the "pan-fried parfait", but this time with a little more of a healthy framework (at least I think it was healthier...). Kari had just bought some lovely Astro Original yogurt. It's a full fat yogurt, but it's also one of the least "messed with" in terms of additives and so on. It's just milk, cream and bacterial cultures. It's great in curries too. Regardless, after two desserts with whipped cream as the star, it was time for something lighter.
Now, for many of us, granola, fruit and yogurt is a pretty standard breakfast, and a tasty one at that! But when doing dessert, you need to add a certain flair. Kari was fine with just blueberries and yogurt, but the frozen state of the berries made it necessary to tweak things a bit. I started thawing/cooking the berries in a saucepan on their own when I realized that they needed some liquid to help the cooking process. Now, I could have just used water and that would have been fine, but I realized that it would be a damn sight better if I used some red wine to macerate the fruit as it thawed. I threw in some maple syrup, a pinch of both cinnamon and nutmeg, then some lime juice, and suddenly we'd made sort of a "Mulled Blueberry Wine" sauce! Then, another flash of inspiration hit as I thought about the fruit/yogurt combo and how it usually went with granola. We just so happened to have some "sweet and salty" granola bars, so I chopped those up and sprinkled them on top. |
 |
| Yogurt, Blueberry-Wine Sauce and Granola Bar Pieces |
I was a smidge uncertain as to how good it would be, but it turned to be pretty darn tasty! I was gaining some confidence in my ability to create desserts! Well, three ingredient desserts that were already half made for me, anyway...
A Breakthrough in Vanilla!
But it was only last night (January 13, 2012) that I really impressed myself in the dessert field. Kari was heading off to kick all kinds of butt training for a run and I was in charge of dinner. Dinner itself was pretty simple: stuffed pork chops, roasted potatoes and roasted cauliflower. When I asked Kari what she wanted for dessert, she offhandedly mentioned a craving for vanilla pudding. I had the powdered Jell-O stuff in mind, but that wasn't going to cut it. So, I looked up a recipe on the Internet and found the following at
Allrecipes.com (which I followed to the letter):
Old-Fashioned Vanilla Pudding
Serves 2
Ingredients
- 2 tablespoons sugar
- 1 tablespoon cornstarch
- 1/8 teaspoon salt
- 1 cup 2% milk
- 1 egg yolk, lightly beaten
- 1 1/2 teaspoons butter
- 1/2 teaspoon vanilla extract (try to avoid artificial extract if possible)
Directions
1. In a small saucepan, combine the sugar, cornstarch and salt. Gradually stir in milk. Cook and stir over medium heat until thickened and bubbly. Reduce heat; cook and stir 2 minutes longer. Remove from the heat.
2. Stir a small amount of hot filling into egg yolk; return all to the pan, stirring constantly. Bring to a gentle boil; cook and stir 1 minute longer. Remove from the heat. Gently stir in butter and vanilla.
3. Cool for 15 minutes, stirring occasionally. Transfer to dessert dishes. Cover and refrigerate for 1 hour.
Just before serving, I grated some dark chocolate over top to add a bit of extra depth to it.
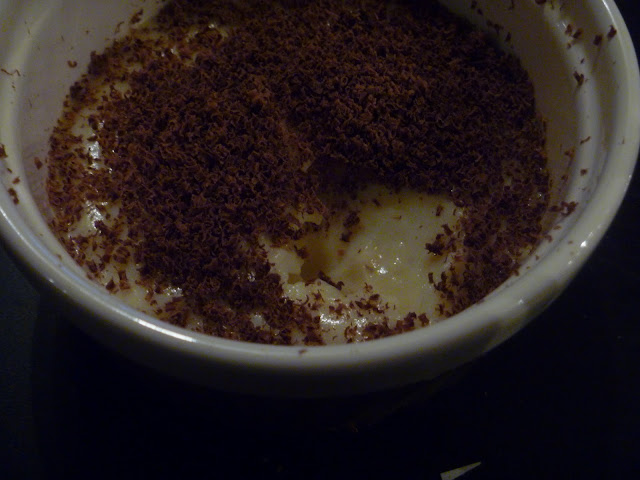 |
| Vanilla Pudding topped with Dark Chocolate Shavings |
Wow, wow, wow... It was soooooooo tasty! Creamy, rich and yet delicate. Makes the Jell-O stuff taste like powdered crud. And really not too difficult, just labour intensive.
So, there you go, no-bake dessert crafting made simple. Now, that isn't to say that you should give up on any pursuit of baking. Lord knows I need to try my hand at pie crust someday - if only to make the following alliteration real: Pulled Pork Pie.
But if you're craving that "bite of sweet", you can still make it yourself with far less difficulty than you might expect.
Enjoy! Cheers!


