Saturday, November 20, 2010

Breakfast goodness - Part 1

-
Well, I am hoping that by now you've managed to cook your way into seduction as per the original aim of this blog. If you haven't, go back to the first post and try again!

As for the rest of you, now it's time for the most important meal of the day: Breakfast!

Now, if you're like me, breakfast isn't the first on your list of meals for practicing the fine art of cooking. I've always been a 'bowl of cereal and cup of coffee' kind of guy. That was before meeting my girlfriend who is a total breakfast-o-phile. She's made some craziness in that department! Example: tater tots, bacon and cheese smothered in Hollandaise sauce. I got through about 5 bites. Maybe she should send it in as a This Is Why You're Fat entry.

Now, that being said, I've had a lot of delicious breakfasts since we've been together and would like to share some of them with you.

Alright, where to begin, hmmmmmmmm...

Well, I figure we'll start smallish and healthier.

An easy, nutritious and tasty breakfast is the smoothie. While not a solid meal, it has most of the ingredients one needs to start their day and is very simple to prepare (as long as you have a blender).

Basically, a smoothie is milk, fruit and a sweetener, if required. Many other ingredients can be thrown in as you see fit, such as yogurt, cereal (such as All-Bran for fibre) and vitamin supplements.

Here's a fairly tasty smoothie I make somewhat regularly:

Strawberry Banana Mango Smoothie

2 cups milk (2%, 1% or Skim)
1/2 cup banana slices
1/2 cup mango chunks (I use bags of frozen mango bought at the supermarket)
1/4 cup strawberries
1 tbsp sugar or honey
3 tbsp plain yogurt

Combine all ingredients in blender and blend until smooth.

If mixture is very thick, add more milk and continue blending.

Any kind of liquid can be substituted for milk. I've used pineapple and orange juice. You can always use soy/almond/hemp/whatever milk, if you can stand that stuff (I can't).

Serve in a couple of big glasses and there you have it.

Another "healthy" choice is a simple offering of plain yogurt, granola and fresh strawberries. Slice the strawberries, toss in a bowl with granola, spoon in a generous dollop of yogurt, top with a teaspoon of maple syrup and voilà!

Omelettes

Next up is an old favourite: the omelette. Now, omelettes aren't really complicated at all. They're basically made much the same way as scrambled eggs (I'll assume you all know how to make scrambled eggs), with just a bit more skill required.

I'll walk you through the process.

First of all, the size of the omelette is based on how many people are eating it. Let's assume Romeo (or Juliet) that this is an intimate breakfast for two. So, let's go with two eggs per person, grand total of four eggs.

Now, you need to figure out what you like in your omelette. I usually go with something simple like onion, red pepper, mushroom and cheddar, so let's assume you're going to make that too.

Dice onion and pepper fairly small (about half a centimetre in width), slice mushrooms. Sauté all veggies in butter until soft. Put in a bowl and set aside.

Crack the eggs in another  bowl. (If you don't know how to crack an egg by now, I think this is about the time you rush out for McMuffins. Fail.) Add about 1/2 cup milk. Whisk with a fork. Set aside.

In a large (and I do mean large) frying pan, melt about 2 tablespoons butter. Yeah, omelettes aren't diet food either. As the butter melts, make sure you manipulate it as to coat the whole pan. This is VERY important, as it will help the omelette cook evenly and not stick. Be careful not to burn the butter either.

Once your pan is coated, pour in the egg/milk mixture. Let it cook on medium high heat until the edges start to become solid and recede from the sides of the pan.

Add your veggies and cheese and let cook for about 5 minutes, allowing the cheese to start melting.

Now this is the tough part: folding the omelette over. Make sure you have a fairly wide spatula or damn agile hands. You can either use the spatula to fold one side of the omelette onto the other, or do it by flipping one side onto the other with just the pan. Now, if you're like me, you suck at both and are going to break the omelette's beauty.

Here's what a properly folded omelette looks like:

(side note: Avocado Omelette? YES PLEASE!)


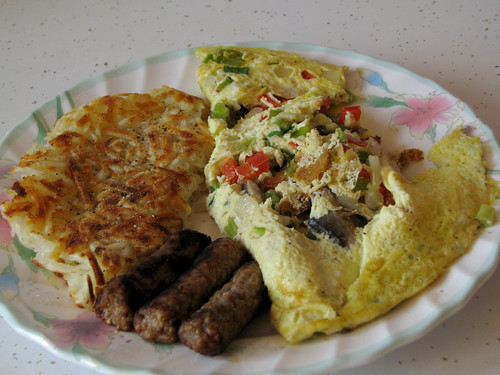
Here's what mine usually look like (ignore the hash browns and sausages on the left of the plate):


But if you're like me, presentation means sweet frak all, as long as it tastes good! Now, I like my omelettes (and all my eggs really) well done, almost crispy. Just remember that the longer you cook it, the drier the eggs will be. The goodness or badness of this fact is purely subjective.

Either way, once you've gracefully folded the omelette, or not, slide it onto a plate and slice into two equal servings. Serve one half to your guest and eat the other. Enjoy!


Now, the breakfasts I've shown you so far are somewhat reasonable affairs and not too over-the-top. That all changes with the next post. That's when we bring in the meat!

Until then, enjoy your morning!

A new pasta recipe of utter luxury - sort of...

-

Hello again!

It's easy enough to make pasta, as demonstrated (hopefully) in my first set of posts. And the great thing about pasta is that you can experiment to your heart's content with the sauce. You can go from something light like an oil and garlic sauce to the decadent richness of an Alfredo or vodka sauce. But what we have here is the pinnacle of decadent. So decadent, in fact, that we're going beyond pasta into the lovely terrain of gnocchi.

Gnocchi is a potato dumpling of sorts, about 1 inch long. You can find it in supermarkets in the pasta section. It cooks in mere minutes and is about as substantial a base for sauce as you can find. You can also make it at home with different ingredients than potatoes (Me or my girlfriend are going to make sweet potato gnocchi at some point).

Here's what it looks like:


Gnocchi is the kind of stick-to-ribs food that would be great after a day in the snow (or an hour shovelling the driveway), especially when you top it with a Gorgonzola-cream sauce. Be warned, this is the opposite of diet food!

Potato Gnocchi w/Gorgonzola-Cream Sauce

Ingredients

1 package potato gnocchi (about 500 grams)

1 tbsp unsalted butter or olive oil
1 small onion, cut in half and sliced thin

3-4 cloves garlic, minced
1 cup whipping or table cream
1/2 cup 2%, 1% or skim milk
100 g (approx) Gorgonzola or other blue cheese (the original recipe calls for Stilton, but that can overpower the palette)
2 tsp finely chopped fresh thyme
2 tsp finely chopped fresh rosemary
Fresh ground black pepper to taste

Directions

In a fairly large pot, bring salted water to boil.

While water is heating to a boil, in a saucepan, melt butter/heat oil (you're using the butter/oil to sauté the garlic and onions, so it's up to you which one you want to use, both are tasty, olive oil is probably better for you).

Sauté onions and garlic until they start to turn golden brown, about 6-8 minutes on medium-high heat.

Add cream and milk and bring to a boil. Be careful when bringing to a boil as the cream/milk mixture will bubble over very quickly making a total mess. Reduce heat to low (2-3) as soon as it boils. Let sauce simmer and reduce a bit (3 minutes or so)

Add cheese a little at a time, stirring constantly, until all cheese has melted into sauce.

Add thyme, rosemary and pepper. Reduce heat to minimum.

Back to the water: once boiling, add gnocchi, stirring to separate each piece. Boil for about 3 minutes. Gnocchi will be ready when it floats to to the top of the pot.

Empty gnocchi into a strainer and drain water. Put gnocchi back into pot.

Pour sauce into pot with gnocchi and mix well.

Serve in bowls with good bread to soak up sauce, a salad, and your favourite wine.

Enjoy! 

Monday, November 1, 2010

A tidbit to whet your appetite for my next full post

-
Hello again!

As I may have mentioned in previous posts, I discovered the art of smoking food a couple of years ago and am really enjoying it. So far, I've done smoked pork back ribs several times, smoked pork tenderloin and smoked tilapia (fish).

When I have a bit more time and experience, I'm going to go into a full-blown post about the art, the joy, the dreams that I've felt while wreathed in smoke on my back deck.

My next thought is to try smoking shrimp. And cabbage.


So, since it seems easiest, here's a completely untested Smoked Cabbage recipe. If you have the tools, give it a try! If not, give me a few days and I'll tell you EVERYTHING I know on the art of smoking food.

Simple Smoked Cabbage


4 servings

Ingredients

1 head cabbage
1/2 cup butter
salt and pepper to taste

Directions

- cut cabbage into fourths place stick of butter in middle close firmly but don't let butter come out of top place heavy aluminum foil around place on smoker for about 4 hours until tender.


Simple enough, right? Well, there are things you'll need and steps to take. If you know them, give 'er. If not and you're completely confused by what I'm talking about, stick around, all will be revealed. I just hope I've piqued your curiosity.


See you soon!